How To Set Imap Retentin Policy In Outlook For Mac
Published on January 11th, 2011 by Kieran 0 Configuring Gmail (IMAP) and Outlook for Mac 2011 Having recently started to use a Mac at home, quickly started to miss Outlook. So I was delighted to hear of the release of.
In Outlook 2013 or 2016 go up to the upper left and click File, then go to Info - Account and Social Network Settings - Account Settings to open the Account Settings window. Click the Email tab if not already selected. Nov 15, 2016 - By default, the Outlook 2016 for Mac folder list groups similar folders, such as. Which folders and messages will have the 16-month employee email retention policy applied to them. Under Personal Settings, click General.

The following are the instructions to set up IMAP access in Outlook 2011. Google Apps users, please follow the default instructions unless otherwise noted, replacing ‘your_domain.com’ with your actual domain name. To set up your Outlook 2011 client to work with Gmail: 1. Don’t forget to click Save Changes when you’re done. Open Outlook 2011.
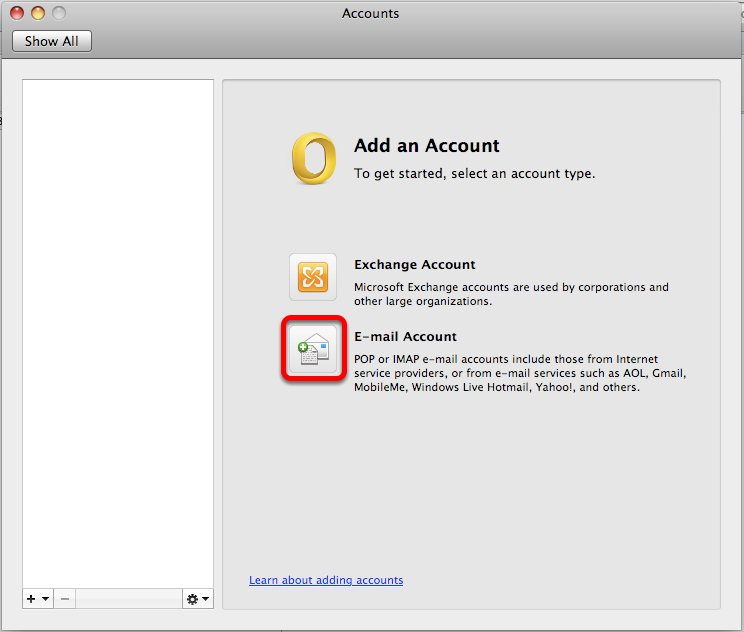
Click Tools > Accounts. On the Accounts window, choose E-mail Account. Enter your email address (including ‘@gmail.com’), and password in the E-mail address filed. Google Apps users, enter your full email address, e.g. As you do so some more options should become available. Once you have entered your Email address the options window will expand: • In the Account Type dropdown menu, select IMAP; enter the incoming and outgoing server names shown below. • In the ‘User Name’ field, give your full Gmail address, including ‘@gmail.com’ or ‘@your_domain.com.’ • Incoming Server, check Override default port and Use SSL to connect (recommended) and change port to 993 • Outgoing Server, check Override default port and Use SSL to connect (recommended) and change port to 587 • After creating these settings, clicking Add Acount takes you to the end of the setup.
This topic will cover how to create Exchange Online (Office 365) Retention Policy Exchange Online Archiving offers two types of policies: archive and delete. Both types can be applied to the same item or folder. For example, a user can tag an email message so that it is automatically moved to the personal archive in a specified number of days and deleted after another span of days. With Outlook 2010 and Outlook Web App, users can apply retention policies to folders, conversations, or individual messages and can also view the applied retention policies and expected deletion dates on messages. Undertale fan games for mac. Users of other email clients can have email deleted or archived based on server-side retention policies provisioned by the administrator, but they do not have the same level of visibility and control.
Aac audio codec for vlc mac. The retention policy capabilities offered in Exchange Online Archiving are the same as those offered in Exchange Server 2010 Service Pack (SP) 1. Administrators can manage retention policies from on-premises Exchange Server 2010 environments. Managed Folders, an older approach to messaging records management that was introduced in Exchange 2007, are not available in and not compatible with Exchange Online Archiving.
Office 365 Retension Tag configuration • Logon to Office 365 portal as cloud administrator • Click on Admin Overview • Click “Manage” under Exchange By default, from the Office 365 portal, when the archive online is enabled, the O365 degault policy will apply, which is 2 year old email will be archieved (Default MRM Policy). So we need to override this to achieve our domain specific needs. If you have not selected any users/configured the users for retention policy, the user mailbox icon (inside the Users & Group Portal) will look like below “Federated users” means those domain users who has ADFS enabled for their single sign-on. Now click the “Mail Control” from the left panel and click “Retention Tag” You will find default tag which is already comes with office 365 portal (which is shown as below).
There are three “types” of tags • Applied automatically for the entire mailbox(All) • Applied automatically to a specified folder • Applied by users to items and folders (Personal) Select “New Tag” and select the “type” as requied. If you select your retention tag as ” Applied automatically for the entire mailbox(All)” then following screen will appear. Fill it up and click “Save” If you select your retention tag as “Applied automatically to a specified folder” then following screen will appear. Fill it up and click “Save” If you select your retention tag as “Applied by users to items and folders (Personal)” then following screen will appear. Fill it up and click “Save” Once you create those retention tags, you are ready to create the retention policy. Click the “Retention Policies” and select “New” Office 365 Retention Policies, by default there is one policy which is having all retention tags. We can manually create retention policies depends for the organization.