Rufus Create Windows Usb For Mac В© 2019
Rufus Create Windows Usb For Mac

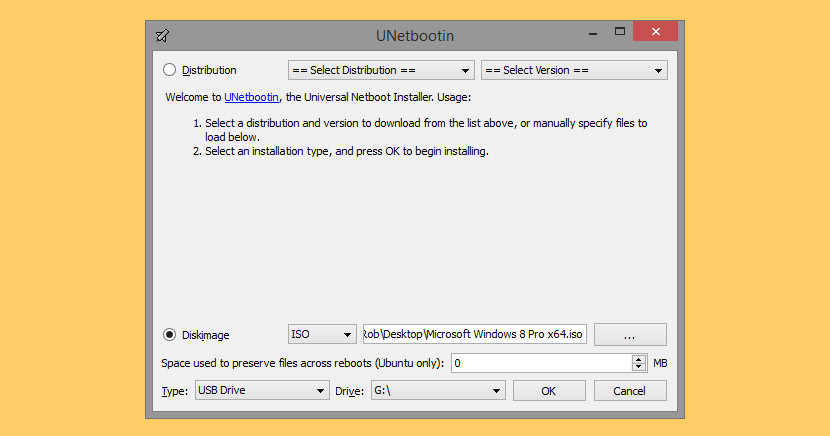
Bootable USB using RUFUS. So that’s pretty much all that you need to know while creating a bootable USB media using Rufus for Installing Windows 10 or Linux distributions. If you’re using a Mac, follow Method 2 for steps on using the terminal to create a Live USB Drive. In the event that you’re already using Ubuntu but you’re looking to create a Live USB Drive for someone else to try, follow Method 3 for instructions on using the Startup Disk Creator to set up a Live USB Drive.
OS X and macOS have had the capability to create install media for quite a while, but this isn't widely known, for two reasons. First, the command to create the bootable installer is well hidden within the installer that's downloaded from the Mac App Store; and secondly, the installer you download has a really annoying habit of automatically starting up once the download is complete. If you then click the install button, you'll find that the installer you downloaded is automatically deleted as part of the normal installation process, preventing you from using it to create a bootable macOS Sierra installer of your own. • A copy of the macOS Sierra installer, available from the Mac App Store. It sometimes takes Apple a little bit of time before the Mac App Store is updated with new releases such as macOS Sierra.
Still, with YouTube Support already available, I imagine it won’t be long until other video providers follow suit. The only caveat: Developers have to enable the feature first. Picture in picture mac os.
If you don't see the operating system available in the store on day one, try performing a search for macOS Sierra in the store. The macOS Sierra installer will start up automatically once the download is completed. Do not continue with the installation as prompted by the installer; instead quit the installer. • Connect the USB flash drive to your Mac. • If the flash drive isn't already formatted for use with your Mac, you can use Disk Utility to format the flash drive using one of the following guides: • (OS X Yosemite and earlier) • (OS X El Capitan or later) • The flash drive needs to have a unique name for use in the createinstallmedia command we'll be using in a moment.
You can use any name you wish, but I’m going to make the following suggestions: • Don’t use any unusual characters; keep the name basic, just simple alphanumeric characters. • Don’t use any spaces in the name.
• We highly recommend using the following name: macOSSierraInstall. • With the flash drive connected to your Mac, launch Terminal, located in /Applications/Utilities.
• Warning: The following command will erase the contents of the flash drive., if needed, before continuing. • In the Terminal window that opens, enter the following command. The command is a single line of text, though it may appear as multiple lines in your browser. If you type the command into Terminal, remember the command is case sensitive.
If you used a name for the flash drive other than macOSSierraInstall, you'll need to adjust the text in the command line to reflect the different name. • The best way to enter the command is to triple-click the line below to select the entire command, copy ( command + c) the text to your clipboard, and then paste ( command + v) the text into Terminal, next to the command prompt. Sudo /Applications/Install macOS Sierra.app/Contents/Resources/ createinstallmedia --volume /Volumes/macOSSierraInstall -- applicationpath /Applications/Install macOS Sierra.app --nointeraction • Once you've entered the command into Terminal, press enter or return on your keyboard.
• You'll be asked for an administrator password. Enter the password, and press enter or return. • The terminal will begin to execute the command and provide you with status updates as the process unfolds. Most of the time is spent writing the installer image to the flash drive; the time it takes is dependent on how fast the flash drive and interface is. Expect anywhere from a short wait to enough time for coffee and a snack. • Once Terminal completes the task, it will display a line saying Done, and the normal Terminal command prompt will reappear. • You can now quit Terminal.
Simcity 4 mac cheat codes. When saving a JPEG, you can choose a compression level from low to high. However, JPEG compression is lossy, so each time you save a JPEG, you lose some data and reduce image quality.