How To Change Controls On Desmume Emulator Mac
Set up Gmail on a Mac Google’s Gmail is a popular email service, both for personal and business use, and there are a number of options for using it on your Mac. By Cliff Joseph. Mailplane is the Mac desktop app that we use everyday to manage our Gmail inbox. We like it because it mimics all the features that you get on Gmail in the browser while providing a desktop app to manage your gmail separately from the (always cluttered) browser experience. Email for Gmail is a Mac Application for Gmail from where users can read mails, reply to them and compose new ones very easily. It comes packed with some amazing features that make it more convenient in working on Gmail. 
 Mar 28, 2014 - This patch adds the audio volume setting feature to the GTK user. Now, when I push the left control key, SPU_SetVolume(0) is called,.
DeSmuME _________________________________________ Copyright (C) 2006 yopyop Copyright (C) 2006-2015 DeSmuME team Last Updated: March 28, 2015 Contents: 1) System Requirements.... 15 2) Quick Start Guide for Using DeSmuME for OS X.. 36 3) Additional Documentation... 201 4) Contact Information.... 231 5) License.... 333 1) System Requirements ________________________________________________________ DeSmuME is a very demanding app, especially for CPU usage.
Before you begin, make sure that your Mac meets the listed system requirements. If your Mac meets only the minimum requirements, then you should expect to run most simple 2D-only games with some frameskip, but you will be unable to run complex 2D games or any 3D-heavy games. However, if your Mac meets the recommended requirements, then you should expect to run almost every game, including very complex 3D-heavy games, with minimal to no frameskip. Operating System: OS X v10.5 (Leopard) or later CPU: Can run on any PowerPC G4, G5, or Intel processor 2.1 GHz Intel Core 2 Duo (minimum) 3.0 GHz Intel Core 2 Duo or faster (recommended) RAM: 512 MB (minimum) 2 GB (recommended) 2) Quick Start Guide for Using DeSmuME for OS X _______________________________ Installing DeSmuME is as easy as copying DeSmuME.app to your Applications folder (or other folder of your choice).
Double-click the app to start DeSmuME. Note that DeSmuME for OS X may have a different feature set than DeSmuME for Windows and DeSmuME for Linux. As of this writing, some features that are present in DeSmuME for Windows are not present in DeSmuME for OS X. The rest of this section will be a guide to help you quickly get started using DeSmuME for OS X.
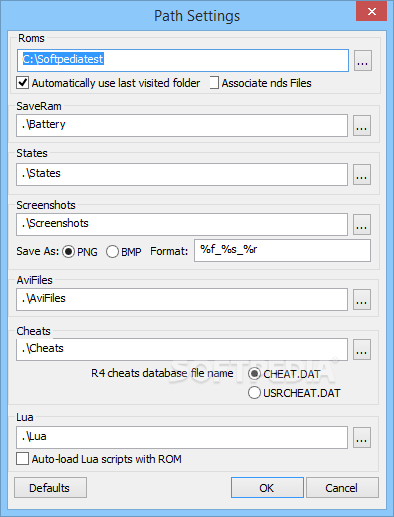
Loading a ROM and Starting the Emulator: Simply double-click the desired ROM from the Finder to play the game. By default, DeSmuME will load the ROM and start emulation. Also, there are additional ROM loading options that you can change in DeSmuME > Preferences if you need them. Using the NDS Controller: Each NDS controller button can be mapped to a button of your choice on your keyboard, gamepad, or joystick. You can view the mappings by clicking on Input in DeSmuME > Preferences. To change a mapping, click on the NDS control that you want to change, then press the button on your input device to map it. By default, the NDS controller is mapped to the following keys on your keyboard: Up - Up Arrow Down - Down Arrow Left - Left Arrow Right - Right Arrow A Button - X B Button - Z X Button - S Y Button - A L Trigger - Q R Trigger - W Start - Return Select - Tab Lid - Delete (Backspace) Microphone (Internal Noise Samples) - ` (Accent) The NDS can support a variety of SLOT-2 devices.
Some devices, such as the Guitar Grip, EasyPiano, and Taito Paddle have inputs, which are mapped to your keyboard using these defaults: Guitar Grip: Green - E Red - R Yellow - T Blue - Y EasyPiano: C - C C# - F D - V D# - G E - B F - N F# - J G - M G# - K A -, (Comma) A# - L B -. (Period) High C - / (Forward Slash) Paddle: Paddle Adjust -5 - O Paddle Adjust +5 - P In addition, the following emulator functions are mapped to your keyboard by default: Execute/Pause - Forward Delete Reset - Page Down Rotate Display Left - [ (Left Bracket) Rotate Display Right - ] (Right Bracket) Set Speed to Half - - (Dash) Set Speed to Double - = (Equal) Using the NDS Touch Pad: Touch pad input is emulated using the left mouse button by default. Simply click in the touch pad area of the NDS display window to use the NDS touch pad. Using the NDS Microphone: Some games make use of the NDS microphone.