How To Make A Bootable Usb For Mac Os X Mavericks Dmg
How To: Remove Duplicates & Customize the “Open With” Menu in Mac OS X How To: Reformat Mac OS X Without a Recovery Disc or Drive How To: Create a Bootable Install USB Drive of Mac OS X 10.10 Yosemite How To: Connect an External Display to Your MacBook, MacBook Air, or MacBook Pro. Oct 22, 2013 - For example, if you want to install Mavericks on multiple Macs, using a. A bootable install drive you create from that installer will install OS X 10.9.0. An update to OS X is released, you can easily erase your bootable USB.
Image via Before You Start The obvious first step here is to. But before you do anything else, a word of caution: once you've used the OS X installer, it will automatically delete the file you need to make the backup disk, so you'll want to either make a copy of the installer or create your disk before you upgrade. You can use a USB flash drive, external hard drive, or DVD-R disc, but the USB drive is quicker. If you're using a USB drive, it has to be formatted as 'Mac OS Extended (Journaled)' and set to partition type 'GUID Partition Table' in order to work. Image via Once inside, browse to the ' Contents > SharedSupport' folder where there will be a file called ' InstallESD.dmg.'
This is the image file that contains the information you need to create the backup disk. Step 2: Open Disk Utility (located in your Applications > Utilities folder). Step 3: Drag and drop the ' InstallESD.dmg' into the list of drives on the left and select it. This should make it appear in the Source box on the right. If not, you may have to click the ' Restore' tab as seen below.
This guide deals with 3 ways of making a boot disk from OSX 10.9 Mavericks the first one is the fastest and is done via the Terminal from a new command already in OSX Mavericks called createinstallmedia, the other 2 are older ways when Mavericks was in development and are done with a mixture of finder using Disk Utility and command line. Quickest Way Download Mac OSX 10.9 Mavericks but don’t install. Attach your USB stick/drive. Launch the Terminal from /Applications/Utilities and enter the command below and then your password when prompted, be sure to change the ‘ Untitled‘ name in the below command to your external disk name: sudo /Applications/Install OS X Mavericks.app/Contents/Resources/createinstallmedia --volume /Volumes/Untitled --applicationpath /Applications/Install OS X Mavericks.app --nointeraction Let it do its thing and there you have it, one bootable Mac OSX 9 drive. This really is a super simple way – however if using the Terminal fills you with fear and dread, there are some GUI apps that can get the job done namely and a new imaging tool that can clone a new disk very quickly –.
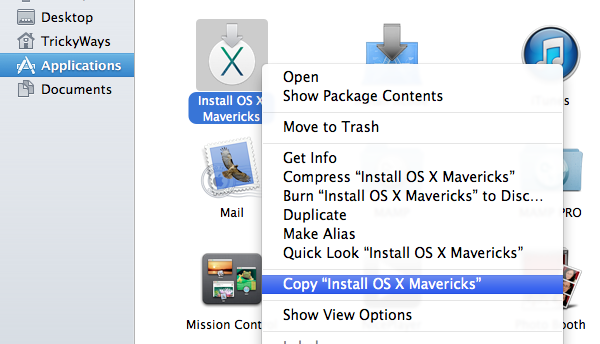
Alternative Ways of building a Bootable Mavericks OSX Disk. To make a boot disk of OSX 10.9 Mavericks, first of all get the app or download via the App store, if downloaded it will file in the folder Applications. Control / Left click Options, Show in Finder to get to the app, don’t install at this stage. Located in the Applications Folder Finding the InstallESD.dmg To find the actual InstallESD.dmg file, control/left click the ‘Install OS X Mavericks’ app and choose show contents – then navigate to Shared Support folder.
Control/Right click to show contents Navigate to Shared Support folder to see the InstallESD.dmg file Mount InstallESD.dmg Double click to mount the image. Make Invisible Files Visible We need to see the BaseSystem.dmg inside the InstallESD.dmg Crank open Terminal and run: defaults write com.apple.Finder AppleShowAllFiles TRUE killall Finder This will show all invisible files have a look inside the mounted InstallESD.dmg Mount an External Disk Attach a USB/external drive – this guide uses the external drive name called BootDisk, you need to make sure the – it its not you can format that in Disk Utility. Launch Disk Utility Launch Disk Utility as found in Applications/Utilities and go to the Restore tab. Drag BaseSystem.dmg to the Source field and your external disk to the Destination and click Restore. This will mount your new OSX 10.9 external disk and name it OSX Base System – but we need to add the packages. Fix the Packages Couple of things to fix in the newly created boot disk, remove the Package alias at System/Installation/ folder Now from the previously mounted InstallESD.dmg copy over the Packages folder to the same location where we just removed the alias above.
• Ignore the error and continue on. Using Clear clears the text and numbers in the Err object, but it does NOT reset the error. • Jump to a specific line. Using On Error As we have seen, VBA will do one of three things when an error occurs • Stop and display the error. 
Will take a while as it holds all the install packages. Job done now you can boot from the OSX 10.9 disk.